|
|
Post by 2alex2 on Mar 13, 2012 20:54:34 GMT 1
so now onthe final stage of getting the car ready for pisnt as i rang up and booked it in and hoping to get it down to him the end of next week jsut a few bits of filler left to sort out and a few mroe holed to drill before it goes off cant wait now as its so close to being onthe road then i will get it back to gether for the 20th april
|
|
|
|
Post by dai9fxey on Mar 13, 2012 21:54:11 GMT 1
Bet you can't wait. After all your trials and tribulations It'll be well worth the effort.  |
|
|
|
Post by 2alex2 on Mar 13, 2012 23:01:31 GMT 1
yea will be just got to sort out the mot as well now will get that sorted ones its back and all back to gether jsut hope it passes other than that im quite exsited to drive it as i havent driven it yet  |
|
|
|
Post by 2alex2 on Mar 18, 2012 20:59:43 GMT 1
hey everyone so got the last bits doen today didnt managed to look at the rear trumpet or my new adjustable tie bars but did start it up for the first time but im unsure if its running properly. i had to put the battery on for a boost to get it running and add some more fuel as emptyed most of it becasue of moving the tank for resray. but in teh first 10 sec of this vid you can here it poping and spluttering does it sound rigt to youm may sound silly but just didnt sound right but i may be wrong. it may not be that clear but worth a try  |
|
|
|
Post by 2alex2 on Mar 18, 2012 21:08:00 GMT 1
|
|
|
|
Post by 2alex2 on Mar 25, 2012 17:09:29 GMT 1
so the mini has gone for respray final hope everythinkg goes ok . also wanting to know does anyone have a tutorial on how to fit the head light as i dont think they werent done properly in the first place and my dad removed them so im unsure on which sidde bits go.
|
|
|
|
Post by dogsbreath on Mar 25, 2012 20:58:10 GMT 1
hey everyone so got the last bits doen today didnt managed to look at the rear trumpet or my new adjustable tie bars but did start it up for the first time but im unsure if its running properly. i had to put the battery on for a boost to get it running and add some more fuel as emptyed most of it becasue of moving the tank for resray. but in teh first 10 sec of this vid you can here it poping and spluttering does it sound rigt to youm may sound silly but just didnt sound right but i may be wrong. it may not be that clear but worth a try  This sounds better ;D  |
|
|
|
Post by 2alex2 on Mar 25, 2012 21:51:31 GMT 1
its not runnign right i had to drive it to be sprayed to day and its struggled a lot only think i have change though is the air filter
|
|
|
|
Post by 2alex2 on Mar 25, 2012 21:52:53 GMT 1
so i could do with a tutorial on how to set up the carb and to fit the light :S
|
|
|
|
Post by dai9fxey on Mar 25, 2012 22:24:11 GMT 1
You'll have to refresh my memory a bit here Alex.
The new airfilter is a K&N type I imagine.?
Your old air filter was probably a standard type..?
A K & N filter allows a lot more air into the combustion chamber and if the carb is not adjusted your mixture will be out, usually weaker.
Changing from a standard filter to a sports type filter will nearly always mess up your carb settings.
As for the lights there should be a rubber block connector under / behind the slam panel.
Just match the coloured wires from the headlights to the ones that go into the block connector.
|
|
|
|
Post by jackdaw on Mar 26, 2012 8:26:42 GMT 1
To find out if it definately is the air filter thats causing your problems, try refitting the old air filter as it was when the Mini was running correctly and see if the problem has 'gone away'.
If it does correct the running problem, when you then refit the new air filter you will have to follow Dai's method of adjusting the fuel mix or even replacing the carb needle for a richer one, which should cure the problem.
Have you got a Mini Haynes Manual ?
Refitting headlamps and carb mix adjustment sections are in there along with lots of other info that you are gonna need in the future.
|
|
|
|
Post by 2alex2 on Mar 26, 2012 10:38:52 GMT 1
Yea that correct where and what do I need to alter to get it running nicely As for the light it's not the wiring it the lights them selves. Does the plastic bowl go on the out side or inside
|
|
|
|
Post by jackdaw on Mar 26, 2012 11:11:35 GMT 1
You should have a rubber seal that fits on the back of the plastic bowl which then screws onto the wing (from the front) feed the cable and connector into the bowl (maybe better to do that 1st  ) Connect the headlamp bulb and sidelight to its wiring connectors then the headlamp assembly should fix onto the bowl. There is then a securing ring which should screw in to fix the headlamp in place. Finally there should be a headlamp trim ring which hooks over the top of the headlamp fitting and secures underneath with 1 largish screw. There is a full descripion (with pics!) in the Haynes Manual (Pages 203/204) Another way is to find a friendly Mini owner near you who will be willing for you to carefully dismantle one of his headlamps to see how it all fits    ;D Hope that helps. |
|
|
|
Post by 2alex2 on Mar 26, 2012 13:13:00 GMT 1
That's all I need to know which side the bowl went as my dad can't remembered how he took them off. As for the carb it's now in spray shop so will take the old filter when I go and pic it up and fit the old one and see how it goes if not then I thing it's the distributor timing
|
|
|
|
Post by 2alex2 on Mar 26, 2012 19:24:50 GMT 1
also got a new electronic ignition kit for the distributor to help with any timin problems i may get later on and i have been advised to get one befoer the L2B run as they are more reliable
|
|
|
|
Post by 2alex2 on Mar 27, 2012 18:28:06 GMT 1
well not impressed with the painter so far he is wanting to cut the mini up and bit more to make the problem i had witht he door better but i want to attack the door not the chassis and i wanted to do it as saves me money but said i should have my hands tied up and not touch it any more. so looks like more work for him and more cost for me not impressed
|
|
|
|
Post by jackdaw on Mar 27, 2012 19:03:21 GMT 1
That sucks but you would probably be better going with his recommendations for the sake of getting a good paint job in the end.
Does he know you want to keep the cost down ?
Maybe you can come to a compromise over what has to be done ?
|
|
|
|
Post by 2alex2 on Mar 27, 2012 19:10:12 GMT 1
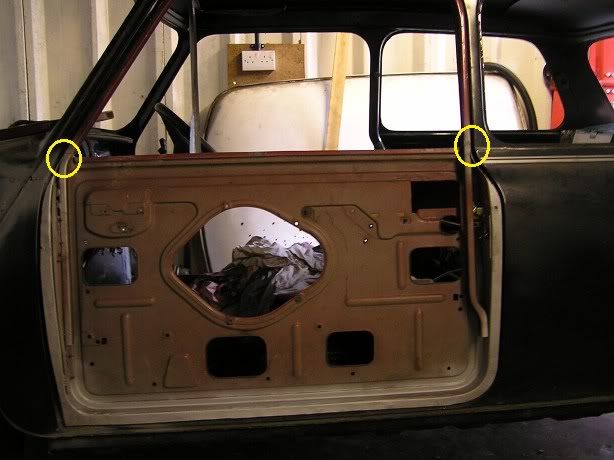
well he does know abotu the money side as he sugested to go with a flat brg but the mini i have is s special edition which was metalic brg as far as i was awear so wanted to keep that original. but think is i said to cut the door up but he want so cut the chassis up but ht only think i can say to that is that it could weeken the chassi at those points. here is a sample pic of where its tight  as i was thinking cut the fram for the window seal move it in then use the grinder to take back the outer skin enough then weld it up so it doesnt come off then grind it down a gain so it doesnt look like that work had been done |
|
|
|
Post by dai9fxey on Mar 27, 2012 19:41:17 GMT 1
The Mini Racing only had one colour choice and that was flat British Racing Green with white roof.
Version 2 which came out in 1990 also had the same colour scheme.
The British Open had Metallic BRG.
Has the painter got a "Porta Pack". It's a Hydraulic ram which which can be used to forcibly, but gently adjust door gaps and aperatures.?
Might be another option to save cutting the "chassis".
|
|
|
|
Post by jackdaw on Mar 27, 2012 19:44:23 GMT 1
All Mini Doors were "adjusted" to fit with a 'kin big hammer when they were made at Longbridge - I know, I saw them at work !!!!!  That being the case I would go with altering the door !  |
|